Cheap, Quick, Fast, Static Sites
Disclaimer : I am not a web developer.
It took me longer than I care to admit to figure out how to host a static site cheaply and without doing much configuration. Following this should get you up and running with your own domain and site in very little time and let you skip some of the dead ends I went down.
The total cost of creating my personal website, nickcortale.me, was only $7 since I qualify for Amazon’s free tier.
Video
There is a great youtube video outlining this process. The UI’s of the sites have changed a little, but otherwise everything works. So if you don’t want to read this post, here is a video that outlines everything you need to know. MicrowaveSam - Youtube
The purpose of this post is to outline why I made some of the decisions I made and solidify the directions in text form.
Let’s go.
Creating a Static Site
A web page is considered static if it serves the same content for everyone who accesses the site. For example, your favorite restaurant’s webpage is most likely static –everyone receives the same menu, address, and pictures. Sites where you can log in and content changes are considered dynamic. For example, Reddit, Facebook, and Twitter are all dynamic.
Why Static?
- Extremely Fast. Just serves the content.
- Reliable. No databases to worry about.
- Light weight. This site is less than 5Mb.
- Secure. No databases to be injected.
- Fun. I like them.
- Powerful. Think Obama’s 2012 campaign.
Okay. Now that you’re convinced, let’s get to it. I suggest jekyll, which is what built this site, or grabbing a HTML template from HTML5 UP. There are tons of tutorials out there on creating a static site, so I am not going to get into that here. The actual jekyll documentation is quite nice.
Hosting the Site
I originally found this post which lists cheap hosting options. After some googling and contemplating, I decided to go with Amazon S3. I intended to get involved with amazon’s services at some point so this seemed like a good opportunity. It also scales really well. If this site ever becomes popular (yea, okay), it can handle the traffic.
Note: Hosting and Amazon S3 setup both require the same name. Make sure you can get that name on amazon S3 and with the domain name registrar.
Set Up
Let’s start with setting everything up on Amazon first.
1. Create an Account
First, create an account for Amazon’s web services if you don’t have one already. You should be able to get the services free for the first year which is awesome!
2. Go to the S3 Console
Next we need to click on s3 which is on the far right under services. I’m sure the location of the logo will change in the future, so you might have to do a little hunting through all Amazon’s products.
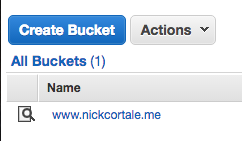
3. Create a bucket
Next you want to create a bucket and call it www.yourdomain.com, but replace yourdomain.com with whatever you purchased. This is extremely important. After your bucket is created, it should look like the image below. I bought nickcortale.me, so my bucket is called www.nickcortale.me.
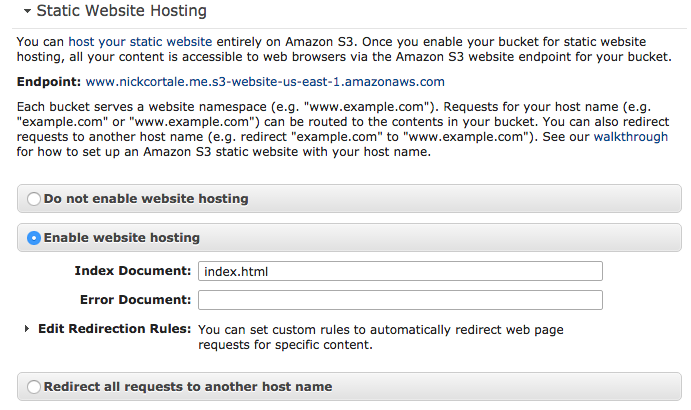
4. Allow bucket to host websites
Next, we need to allow our bucket to host websites. You will find this by clicking properties on the top right and then going down to static website hosting. Fill in the fields as shown below. This assumes your landing page is named index.html.
If it is something else, just swap the name.
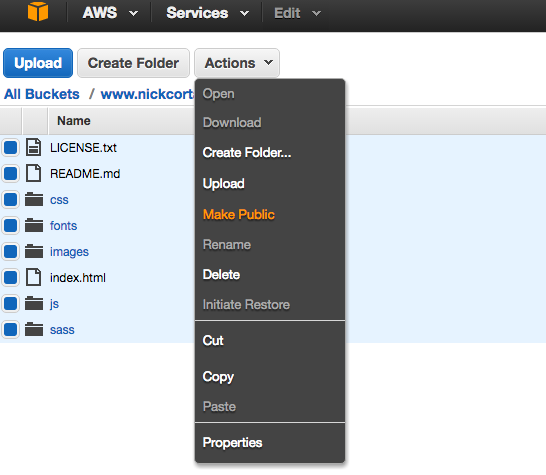
5. Upload files and make them public
Next, we want to upload all of our files to the bucket. After it has been uploaded, we need to set all the files to public. This allows people to see the files when they access the site.
5a. Make a note of the URL
Next, make a note of the website address that Amazon assigns you. This can be found under the static site tab. We will need this when we register on namecheap.

Domain Name Registration
I decided to buy my domain name from namecheap.com. I’ve used other domain name registrars before, but have heard good things about namecheap.com, so I decided to give them a try. They have had great customer service thus far, so I would recommend them. They also have good prices.
Back to business.
6. Buy a domain name
Register a domain name. Remember it must be the same domain name as what you called your bucket. So if you called your bucket www.eatvegetables.com you must buy the domain eatvegetables.com or you have to go back and change the bucket name to whatever you just decided to buy.
7. Configure DNS settings
This is the part that tripped me up when I was trying to figure this out. We need to point our domain to our s3 bucket. Amazon gives some instructions, but it turns out all you have to do is edit your DNS settings. It should look like the image below.
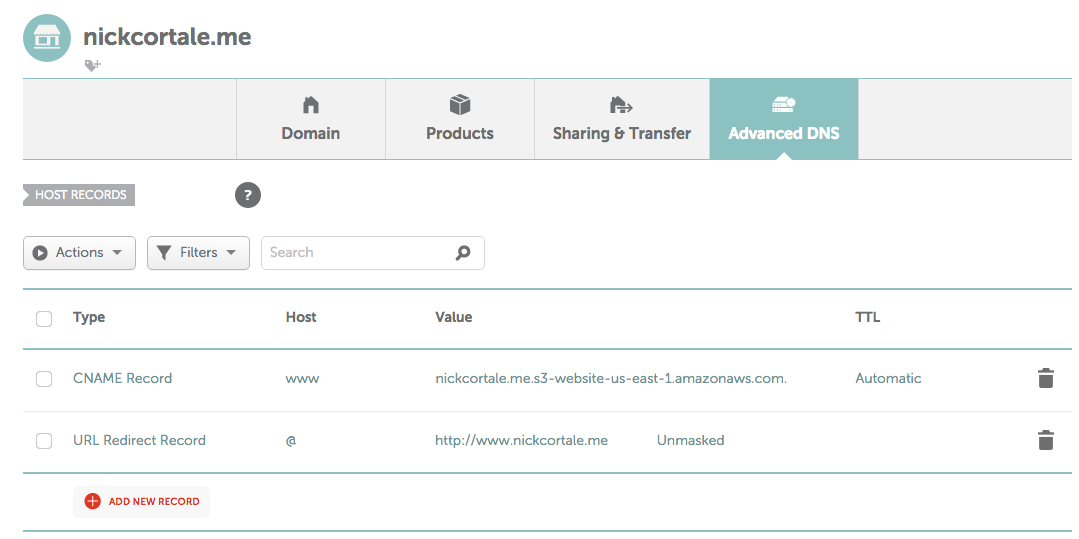
That should be it. Give it a couple minutes to update and your website should be up and running.
Just for reference here are amazon’s instructions. I messed with these for a while, but could never get anything working. I eventually bailed and found the video that I linked to at the top of the post.